Computer Vision Tutorial: Implementing Mask R-CNN for Image Segmentation (with Python Code)
Overview
- Mask R-CNN is a state-of-the-art framework for Image Segmentation tasks
- We will learn how Mask R-CNN works in a step-by-step manner
- We will also look at how to implement Mask R-CNN in Python and use it for our own images
Introduction
I am fascinated by self-driving cars. The sheer complexity and mix of different computer vision techniques that go into building a self-driving car system is a dream for a data scientist like me.
So, I set about trying to understand the computer vision technique behind how a self-driving car potentially detects objects. A simple object detection framework might not work because it simply detects an object and draws a fixed shape around it.
That’s a risky proposition in a real-world scenario. Imagine if there’s a sharp turn in the road ahead and our system draws a rectangular box around the road. The car might not be able to understand whether to turn or go straight. That’s a potential disaster!

Instead, we need a technique that can detect the exact shape of the road so our self-driving car system can safely navigate the sharp turns as well.
The latest state-of-the-art framework that we can use to build such a system? That’s Mask R-CNN!
So, in this article, we will first quickly look at what image segmentation is. Then we’ll look at the core of this article – the Mask R-CNN framework. Finally, we will dive into implementing our own Mask R-CNN model in Python. Let’s begin!
Table of Contents
- A Brief Overview of Image Segmentation
- Understanding Mask R-CNN
- Steps to implement Mask R-CNN
- Implementing Mask R-CNN
A Brief Overview of Image Segmentation
We learned the concept of image segmentation in part 1 of this series in a lot of detail. We discussed what is image segmentation and its different techniques, like region-based segmentation, edge detection segmentation, and segmentation based on clustering.
I would recommend checking out that article first if you need a quick refresher (or want to learn image segmentation from scratch).
I’ll quickly recap that article here. Image segmentation creates a pixel-wise mask for each object in the image. This technique gives us a far more granular understanding of the object(s) in the image. The image shown below will help you to understand what image segmentation is:

Here, you can see that each object (which are the cells in this particular image) has been segmented. This is how image segmentation works.
We also discussed the two types of image segmentation: Semantic Segmentation and Instance Segmentation. Again, let’s take an example to understand both of these types:

All 5 objects in the left image are people. Hence, semantic segmentation will classify all the people as a single instance. Now, the image on the right also has 5 objects (all of them are people). But here, different objects of the same class have been assigned as different instances. This is an example of instance segmentation.
Part one covered different techniques and their implementation in Python to solve such image segmentation problems. In this article, we will be implementing a state-of-the-art image segmentation technique called Mask R-CNN to solve an instance segmentation problem.
Understanding Mask R-CNN
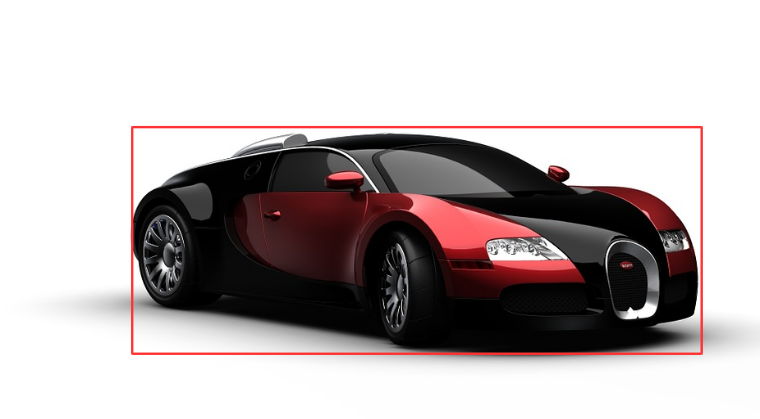
Mask R-CNN is basically an extension of Faster R-CNN. Faster R-CNN is widely used for object detection tasks. For a given image, it returns the class label and bounding box coordinates for each object in the image. So, let’s say you pass the following image:

The Fast R-CNN model will return something like this:

The Mask R-CNN framework is built on top of Faster R-CNN. So, for a given image, Mask R-CNN, in addition to the class label and bounding box coordinates for each object, will also return the object mask.
Let’s first quickly understand how Faster R-CNN works. This will help us grasp the intuition behind Mask R-CNN as well.
- Faster R-CNN first uses a ConvNet to extract feature maps from the images
- These feature maps are then passed through a Region Proposal Network (RPN) which returns the candidate bounding boxes
- We then apply an RoI pooling layer on these candidate bounding boxes to bring all the candidates to the same size
- And finally, the proposals are passed to a fully connected layer to classify and output the bounding boxes for objects
Once you understand how Faster R-CNN works, understanding Mask R-CNN will be very easy. So, let’s understand it step-by-step starting from the input to predicting the class label, bounding box, and object mask.
Backbone Model
Similar to the ConvNet that we use in Faster R-CNN to extract feature maps from the image, we use the ResNet 101 architecture to extract features from the images in Mask R-CNN. So, the first step is to take an image and extract features using the ResNet 101 architecture. These features act as an input for the next layer.
Region Proposal Network (RPN)
Now, we take the feature maps obtained in the previous step and apply a region proposal network (RPM). This basically predicts if an object is present in that region (or not). In this step, we get those regions or feature maps which the model predicts contain some object.
Region of Interest (RoI)
The regions obtained from the RPN might be of different shapes, right? Hence, we apply a pooling layer and convert all the regions to the same shape. Next, these regions are passed through a fully connected network so that the class label and bounding boxes are predicted.
Till this point, the steps are almost similar to how Faster R-CNN works. Now comes the difference between the two frameworks. In addition to this, Mask R-CNN also generates the segmentation mask.
For that, we first compute the region of interest so that the computation time can be reduced. For all the predicted regions, we compute the Intersection over Union (IoU) with the ground truth boxes. We can computer IoU like this:
IoU = Area of the intersection / Area of the union
Now, only if the IoU is greater than or equal to 0.5, we consider that as a region of interest. Otherwise, we neglect that particular region. We do this for all the regions and then select only a set of regions for which the IoU is greater than 0.5.
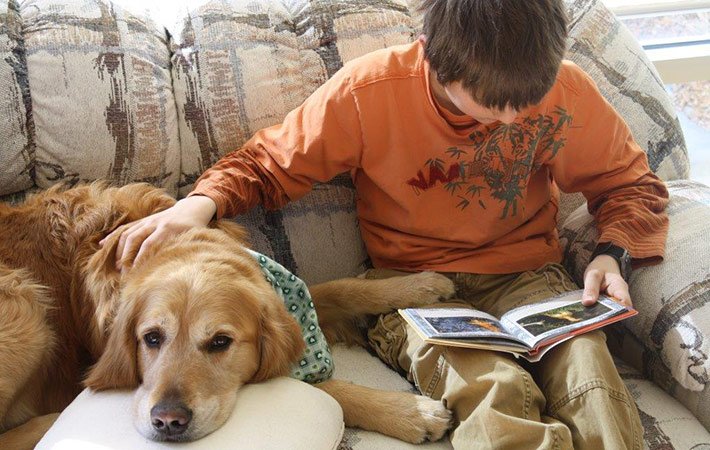
Let’s understand it using an example. Consider this image:
Here, the red box is the ground truth box for this image. Now, let’s say we got 4 regions from the RPN as shown below:

Here, the IoU of Box 1 and Box 2 is possibly less than 0.5, whereas the IoU of Box 3 and Box 4 is approximately greater than 0.5. Hence. we can say that Box 3 and Box 4 are the region of interest for this particular image whereas Box 1 and Box 2 will be neglected.
Next, let’s see the final step of Mask R-CNN.
Segmentation Mask
Once we have the RoIs based on the IoU values, we can add a mask branch to the existing architecture. This returns the segmentation mask for each region that contains an object. It returns a mask of size 28 X 28 for each region which is then scaled up for inference.
Again, let’s understand this visually. Consider the following image:
The segmentation mask for this image would look something like this:
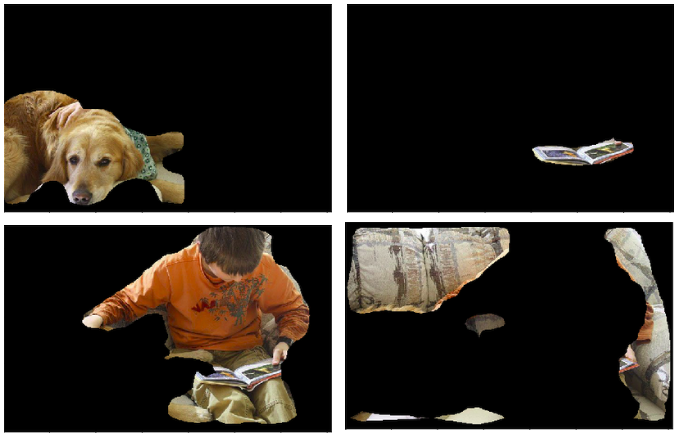
Here, our model has segmented all the objects in the image. This is the final step in Mask R-CNN where we predict the masks for all the objects in the image.
Keep in mind that the training time for Mask R-CNN is quite high. It took me somewhere around 1 to 2 days to train the Mask R-CNN on the famous COCO dataset. So, for the scope of this article, we will not be training our own Mask R-CNN model.
We will instead use the pretrained weights of the Mask R-CNN model trained on the COCO dataset. Now, before we dive into the Python code, let’s look at the steps to use the Mask R-CNN model to perform instance segmentation.
Steps to implement Mask R-CNN
It’s time to perform some image segmentation tasks! We will be using the mask rcnn framework created by the Data scientists and researchers at Facebook AI Research (FAIR).
Let’s have a look at the steps which we will follow to perform image segmentation using Mask R-CNN.
Step 1: Clone the repository
First, we will clone the mask rcnn repository which has the architecture for Mask R-CNN. Use the following command to clone the repository:
git clone https://github.com/matterport/Mask_RCNN.git
Once this is done, we need to install the dependencies required by Mask R-CNN.
Step 2: Install the dependencies
Here is a list of all the dependencies for Mask R-CNN:
- numpy
- scipy
- Pillow
- cython
- matplotlib
- scikit-image
- tensorflow>=1.3.0
- keras>=2.0.8
- opencv-python
- h5py
- imgaug
- IPython
You must install all these dependencies before using the Mask R-CNN framework.
Step 3: Download the pre-trained weights (trained on MS COCO)
Next, we need to download the pretrained weights. You can use this link to download the pre-trained weights. These weights are obtained from a model that was trained on the MS COCO dataset. Once you have downloaded the weights, paste this file in the samples folder of the Mask_RCNN repository that we cloned in step 1.
Step 4: Predicting for our image
Finally, we will use the Mask R-CNN architecture and the pretrained weights to generate predictions for our own images.
Once you’re done with these four steps, it’s time to jump into your Jupyter Notebook! We will implement all these things in Python and then generate the masks along with the classes and bounding boxes for objects in our images.
Implementing Mask R-CNN in Python
Sp, are you ready to dive into Python and code your own image segmentation model? Let’s begin!
To execute all the code blocks which I will be covering in this section, create a new Python notebook inside the “samples” folder of the cloned Mask_RCNN repository.
Let’s start by importing the required libraries:
Next, we will define the path for the pretrained weights and the images on which we would like to perform segmentation:
If you have not placed the weights in the samples folder, this will again download the weights. Now we will create an inference class which will be used to infer the Mask R-CNN model:

What can you infer from the above summary? We can see the multiple specifications of the Mask R-CNN model that we will be using.
So, the backbone is resnet101 as we have discussed earlier as well. The mask shape that will be returned by the model is 28X28, as it is trained on the COCO dataset. And we have a total of 81 classes (including the background).
We can also see various other statistics as well, like:
- The input shape
- Number of GPUs to be used
- Validation steps, among other things.
You should spend a few moments and understand these specifications. If you have any doubts regarding these specifications, feel free to ask me in the comments section below.
Loading Weights
Next, we will create our model and load the pretrained weights which we downloaded earlier. Make sure that the pretrained weights are in the same folder as that of the notebook otherwise you have to give the location of the weights file:
Now, we will define the classes of the COCO dataset which will help us in the prediction phase:
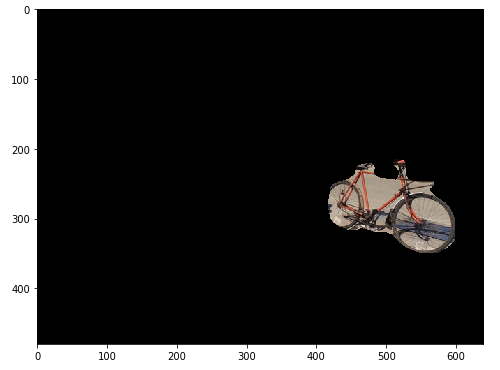
Let’s load an image and try to see how the model performs. You can use any of your images to test the model.

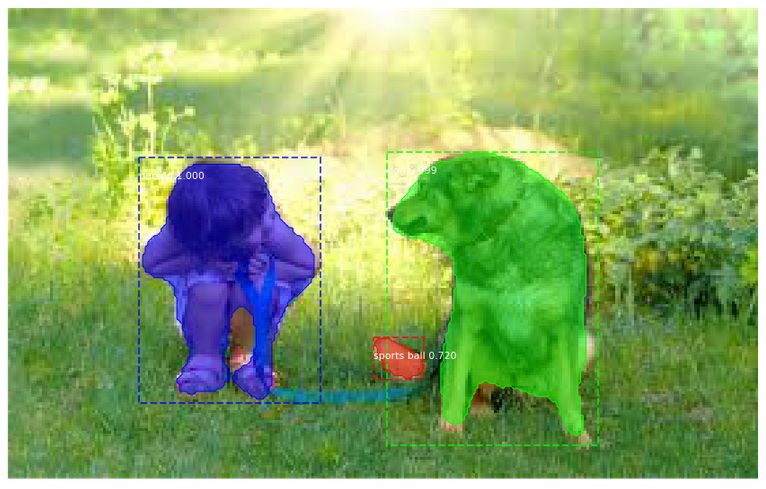
This is the image we will work with. You can clearly identify that there are a couple of cars (one in the front and one in the back) along with a bicycle.
Making Predictions
It’s prediction time! We will use the Mask R-CNN model along with the pretrained weights and see how well it segments the objects in the image. We will first take the predictions from the model and then plot the results to visualize them:

Interesting. The model has done pretty well to segment both the cars as well as the bicycle in the image. We can look at each mask or the segmented objects separately as well. Let’s see how we can do that.
I will first take all the masks predicted by our model and store them in the mask variable. Now, these masks are in the boolean form (True and False) and hence we need to convert them to numbers (1 and 0). Let’s do that first:
Output:
(480,640,3)
This will give us an array of 0s and 1s, where 0 means that there is no object at that particular pixel and 1 means that there is an object at that pixel. Note that the shape of the mask is similar to that of the original image (you can verify that by printing the shape of the original image).
However, the 3 here in the shape of the mask does not represent the channels. Instead, it represents the number of objects segmented by our model. Since the model has identified 3 objects in the above sample image, the shape of the mask is (480, 640, 3). Had there been 5 objects, this shape would have been (480, 640, 5).
We now have the original image and the array of masks. To print or get each segment from the image, we will create a for loop and multiply each mask with the original image to get each segment:


This is how we can plot each mask or object from the image. This can have a lot of interesting as well as useful use cases. Getting the segments from the entire image can reduce the computation cost as we do not have to preprocess the entire image now, but only the segments.
Inferences
Below are a few more results which I got using our Mask R-CNN model:


Looks awesome! You have just built your own image segmentation model using Mask R-CNN – well done.
End Notes
I love working with this awesome Mask R-CNN framework. Perhaps I will now try to integrate that into a self-driving car system. 🙂
Image segmentation has a wide range of applications, ranging from the healthcare industry to the manufacturing industry. I would suggest you try this framework on different images and see how well it performs. Feel free to share your results with the community.
In case you have any questions, doubts or feedback regarding the article, do post them in the comments section below.


Hi Pulkit, great article I was looking for the same. Thanks for sharing.
Glad you found it useful Vaibhav!
i wanna know about the weights
hey really nice article...I am trying to recognize and classify SSD boards is this something i can employ in my research
Hi Praketa, You can surely try this Mask R-CNN framework for your use case. Do share the results here with the community which will help them in learning.
Hello Pulkit, Yet again, nice way to explain the key concepts.
Glad that you liked it Pankaj! Stay tuned for more such articles on computer vision.
can you explain in the same way for yolo and single shot multi box detector.
Hi, I have previously written an Article where I have explained YOLO step by step. You can read about that here: https://demo3.aifest.org/blog/2018/12/practical-guide-object-detection-yolo-framewor-python/
I'm training MaskRCNN for custom dataset using pretrained yolo weights, and default configuration with changes in class names, I have trained network heads for 90epoch and the entire network later for (125-90)epochs with 100 iterations per epoch, the loss is jumping and the model is not converging. What do I do
Hi Rohan, Try to reduce the learning rate of the model which might help the model to converge.
This is awesome content Pulkit. Thank you so much for your contribution to enable people like me try out this code. Your detailed step by step explanations are very helpful. I am very grateful. Please continue with this. I really appreciate it! Just one question. When I do the printing loop I get 3 images for each object. First a green one then a blue one and finally the mask. Have I done something wrong? Best regards
Hi Dan, What is the code that you are using to print the mask? The code provided in the article produces the masks for different identified objects.
How to test the unseen dataseen dataset and evaluate mAP on mrcnn
Hi Geet, You can evaluate unseen dataset only if you have the true masks and bounding boxes for these images. Generally, we do not have these masks and bounding boxes and hence we evaluate the model on a validation set.
Hi Pulkit, I want to create a model for face semantic segmentation. Can you please explain the steps in short.
Hi Sunita, You can refer this article which explains semantic segmentation step by step.
Hi Pulkit, Does Mask R-CNN framework not work accurately for finding the inference of aerial images? It was not able to detect the bird instead assumed as kite and in other case for a group of building it gave a result as train. I used the pre-trained labels. Can you please let me know how to label the objects of any given image.
Hi Pulkit Thanks very much for useful Tutorial. I am doing my research on Lungs nodules detection from CT scan. Can I use this Mask R CNN for nodules segmentation provided that I have ground truth ( annotated images) from radiologist?
Hi Hansy, If you have the ground truth values, then you can surely use Mask RCNN to train your own model.
Pulkit Sharma, thanks for your awesome article. Can I use this framework for skin disease ulcers segmentation and detection? Thanks,
Hi Farhad, You can use this framework for skin disease ulcers segmentation as well. In that case, you first have to make a training set where you will have the true labels for images which will be used to train the model.
Thank you for your great tutorial. I have a question about runtime. If we want to report the time takes to get result, do we report the time for training our train set or getting the result from test set? Do these two separated or not? Could you please explain about the time concept in the implementation such a deep model?
Hi Afsin, Both the training as well as the test time matters. Generally, the training time will be much higher as compared to the test time as we are training the model for multiple epochs. So, you can take the inference time or the time taken to make predictions as the metric to report.
Hi! How can i save the each masked image as png or jpg after writing this code: "for i in range(mask.shape[2]): temp = skimage.io.imread('sample.jpg') for j in range(temp.shape[2]): temp[:,:,j] = temp[:,:,j] * mask[:,:,i] plt.figure(figsize=(8,8)) plt.imshow(temp)" I want to save all segmented masks from image without black background. Just segmented masks(images)
Hi, You can use the imsave() function of skimage.io to save these frames. You can place this inside the for loop itself.
Very good article. Have you written on mask R-CNN on own dataset?
Hi, No! I have taken the pre-trained weights and used them to get predictions for my image.
Hi! Have you ever tryed to use an aerial image dataset (from an UAV) containing trees (or vegetation in general) to detect and segment them? I've tryed to do transfer learning and the results are not so good. I have almost 200 images to use as training/test dataset. I know that it is few images, but what you could recommend to acquire best results? Thanks in advance!
Hi Hugo, As you have mentioned that you only have 200 images, this will not be enough to train the model. Try to collect more data and then try to train the model.
Did you get any further with your project? I am also working on something similar. Would love to share knowledge.
I've already trained FRCNN model on a dataset. Can I anyhow use the trained weights (i.e. for FRCNN) in mask-RCNN for segmentation? Thanks in advance.
Hi Abhishek, Since the architecture of both FRCNN and Mask-RCNN is different, the trained weights of FRCNN can not be used with Mask-RCNN. You can either retrain the Mask-RCNN model and get the weights or you can use the pre-trained weights of Mask-RCNN.
Man, you are the best. I'm so grateful man, thanks!
Glad you liked it Andrés!
Thank you for the wonderful guide. I am fresh starter in the area, I am using jupyter on windows 10, my question is how can I download and install the dependencies mentioned in step 2. Step 2: Install the dependencies Here is a list of all the dependencies for Mask R-CNN: numpy scipy Pillow cython matplotlib scikit-image tensorflow>=1.3.0 keras>=2.0.8 opencv-python h5py imgaug IPython
Hi Rabiu, You can use "pip install" to install these libraries. For example, to install numpy, type the following command inside a jupyter notebook: !pip install numpy Similarly, you can install other dependencies as well.
i would try to classify the standing person and sitting person by using object detection technique but i fail to classify this. so ,what technique we will use on it ?
Hi Pawan, This would be a pose detection problem where you are trying to determine the pose of the person (whether it is standing or sitting). Using just the object detection algorithms on this will not be beneficial. So, try out some pose detection algorithms.
how to customize the code for single class like person
Hi lavanya, The code will remain the same, you have to change the training data and retrain the model.
Great Article!
Thank you Thomas!
Hi. Great Article. Could you tell me if this can be used to detect fake images/tampering in images? I want to build a classifier using your model to find out whether an image is take or not. Can it be used ? Please let me know.
Hi Vikram, The task of classifying images as fake or real is a classification task. The model which I covered in this article is for image segmentation tasks. Instead of using this model, you can use simple image classification models to solve your problem. Here is an article which you can refer to learn how to build image classification problems.
Hello, Pulkit Sharma. Thanks for your great article. Can i use this to detect Computer small parts like RAM, processor, motherboard etc. ? I want to classify every parts separately and count them. Please let me know. Thanks in advance.
Hi, Yes you can do that! For this, you first have to train the model on such parts. You have to get a labelled dataset first in which you have the mask for all the parts that you want to detect. Once the model is trained, you can use that trained model to detect parts.
Hello pulkit sharma, Thanks for your article. But I'm doing project on "artichoke flower image" can i use this to detect the artichoke flower. please let me know.. Thank you ..
Hi Mani, You can use this architecture for any segmentation task. But for that you must have a labelled dataset first which will be used to train the model.
Thank you so much. This is a great article and very easy explanation. I got a "ModuleNotFoundError: No module named 'pycocotools' " and solved. If anybody struggling with the same problem on Windows, conda, I am sharing the solution as below. Run the following codes in order conda install git pip install "git+https://github.com/philferriere/cocoapi.git#egg=pycocotools&subdirectory=PythonAPI"
Thank you Kadir for sharing!!
Thanks for this tutorial this hepls me a lot. I need to ask one question. How can i make the masking white. I want objects background white. Thanks for helping.
Hi Mali, You can change all the pixels values of the background with a value of 255.
"Step 3: Download the pre-trained weights (trained on MS COCO) Next, we need to download the pretrained weights. You can use this link to download the pre-trained weights. " There are 4 resources under that link. Which resource is the weights? Wish ML authors would be less sloppy
Hi, I used the weights named mask_rcnn_coco.h5 given under Mask R-CNN 2.0. However you are free to choose from other weights too.
Thank you for your article! I've followed it but I encountered problems with version 2 of tf I have installed on my laptop. I did some changes and now it is working like a treat. I've made the following changes in Mask_RCNN\mrcnn\model.py to accommodate tf v2: ---> line 341 return tf.log(x) / tf.log(2.0) replaced by return tf.math.log(x) / tf.math.log(2.0) ---> lines 720 y 758 keep = tf.sets.set_intersection(tf.expand_dims(keep, 0), replaced by keep = tf.sets.intersection(tf.expand_dims(keep, 0), ---> lines 722 y 760 keep = tf.sparse_tensor_to_dense(keep)[0] replaced by keep = tf.sparse.to_dense(keep)[0]
I've forgotten in my previous post when using model.py with tf v2: Additionally to the mentioned updates I needed to replace in line 772: tf.to_float(tf.gather(class_ids, keep))[..., tf.newaxis], by tf.dtypes.cast(tf.gather(class_ids, keep), 'float32', name='Cast_Float')[..., tf.newaxis], 'float64' did not work for me but 'float32' did :)
Hi Pulkit, Thanks for nice tutorials. I read both of the segmentation articles. I'm wondering if segmentation is better than detection in terms of accuracy. Also, I recently encountered a segmentation algorithm called DeepLab. It would be nice if you can compare it with Mask RCNN as next step
Hi, Segmentation and Detection are two different tasks. Generally, we should not compare these two. Segmentation provides a granular picture as compared to detection. Also, thank you for the suggestion of DeepLab. I will consider it for my future articles.
This was extremely helpful. I think no one has ever done such a detailed step by step explanation.