Introduction
My first encounter with Docker was not to solve a Data Science problem, but to install MySQL. Yes, to install MySQL! Quite an anti-climatic start, right? At times, you stumble upon jewels while going through StackOverflow and Docker was one of them. What started with a one-off use case, ended up becoming a useful tool in my daily workflow.
I got a taste of docker when I tried to install TensorFlow in my system. Just to give you the context, TensorFlow is a deep learning library which requires a series of steps that you ought to do for system setup. Especially it is extremely complex to install Nvidia Graphics drivers. I literally had to reinstall my Operating system countless number of times. That loop stopped only when I shifted to docker, thankfully!
Docker provides you with an easy way to share your working environments including libraries and drivers. This enables us to create reproducible data science workflows.
This article aims to provide the perfect starting point to nudge you to use Docker for your Data Science workflows! I will cover both the useful aspects of Docker – namely, setting up your system without installing the tools and creating your own data science environment.
Table of Contents
- What is Docker?
- Use Cases for Data Science
- Docker terminology
- Docker Hello-World
- Data Science tools without installation
- Your first Docker Image
- Docker eco-system
1. What is Docker?
Docker is a software technology providing containers, promoted by the company Docker, Inc. Docker provides an additional layer of abstraction and automation of operating-system-level virtualization on Windows and Linux.

The underlying concept that Docker promotes is usage of containers, which are essentially “boxes” of self-
2. Use Cases for Data Science
When you walk into a cubicle of Data Science folks, they are either doing data processing or struggling to setup something on their work-stations/laptops. Okay, that might be an exaggeration but you get the sense of helplessness. To give a small example, for someone to setup a Caffe environment there are more than 30 unique ways. And trust me, you’ll end up creating a new blogpost just for showing all the steps!

Source: xkcd comics
You get the idea. Anaconda distribution has made virtual environments and replicating environments using a standardized method a reality…yet things do get muddled and sometimes we miss the bullet points in the README file, carefully created to replicate those.
To solve the above problem, bash scripts and makefiles are added which adds to more confusion. It becomes as simple as untangling earphones, phew!
Docker’s learning curve might be a bit steep, but it helps to solve:
-
Distribution and setup of Data Science tools and software:
The Caffe example we discussed is one of the pain points that everyone experiences in their Data Science journey. Not only Docker helps to set a consistent platform via which these tools can be shared, the time wasted in searching for operating system specific installers/libraries is eliminated.
-
Sharing reproducible analysis and code via Docker Images:
Along with sharing the tools (docker images as installers), we can share Jupyter notebooks or scripts along with their results baked inside a Docker image. All the other person/colleague needs to do is run the Docker image to find out what’s there!
-
Sharing Data Science applications directly without a dedicated DevOps team:
In my last article, we looked at how wrapping ML model in an API helps to make it available to your consumers. This is just one part of it. With small teams with no independent DevOps team to take care of deployments, Docker and the eco-system around it — docker-compose, docker-machine helps to ease the problems at a small scale.
Sales guys needs to present an RShiny application but don’t want to run the code? Docker can help you with that!
3. Docker Terminology
I’ve been going on about containers, containerization in the previous section. Let’s understand the Docker terminologies first.
For starters, containers can be thought of as mini-VMs that are light-weight, disposable. Technically though, they are just processes (threads if you might say) that are created when you fire Docker commands in your terminal via their Command Line Interface (CLI).
Docker also provides: images that are essentially snapshots of the containers whose running state is saved using Docker CLI or generated using Dockerfile.
A Dockerfile can be considered as an automated setup file. This small file helps to create/modify Docker images. All the talk makes no sense, until there’s some proof. Let’s dive in and fire up your terminals.
Think of the process of creating a Docker image as creating a layered cake. Dockerfile being your recipe, Docker image created out of various layers.

In the next few sections, we’ll try to get a feel of Docker and work with its command line commands. Also, we’ll create our own Docker Image.
4. Docker: Hello-World
- To install Docker, below are the links for the major operating systems:
- After installation, to test if Docker has been successfully installed run:

- The above output means that Docker CLI is ready. Next step would be to download an image, now how do we get any Docker image. Docker has a repository for that similar to a github repo called Dockerhub. Visit dockerhub to know more.
- After you have logged in, you would see your dashboard (which would be empty at first). Do a quick-search using the Search button and type in:
hello-world. (Below is my dashboard)

- Searching
hello-worldwould give you the results below:

- Click on the first result which also happens to be the official image (created by good folks at Docker, try to use the official images always if there’s a choice or create your own).

- The command:
docker pull hello-worldis what you need to run on your terminal. That’s how you download images to your local system.- To know which images are already present, run:
docker images
- To know which images are already present, run:
- Download the `hello-world` image:

- Run the image using the command: `docker run hello-world`
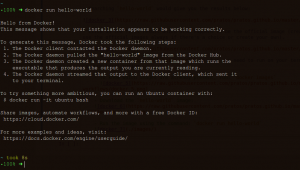
This is all we need to execute a docker image. hello-world is simple, it has to be, but let’s move on to better things. Those that will help more, next section is all about that: Data Science tools without installation, our first use case.
5. Data Science tools without installation:
You have a clean laptop and you need to install TensorFlow in your system, but you are lazy (yes we all are sometimes). You want to procrastinate and not install things on your laptop, but you have Docker installed already as a standard company practice. Hmm, interesting times, you ponder!
You go to Dockerhub and search for the official Docker image for TensorFlow. All you need to run on your terminal is: docker pull tensorflow/tensorflow

As discussed above (in Docker Terminology section), the tensorflow docker image is also a layered object that forms images. Once all the intermediate layers are downloaded, run: docker images to check whether our docker pull was successful.

To run the image, run the command: docker run -it -p 8888:8888 tensorflow/tensorflow
*shrugs*]
Now the above docker run command packs in a few more command line argurments. A few which you need to know better are as follows:
iis running the image interactively.tis to run bash inside the docker container created.pis connect/publish the container ports to host. Here localhost:8888 to 8888 of container.dis to run the container in detached mode i.e. the container would run in the background unlike the above (iwhere once you stop the process the container gets automatically removed).
Now since a docker container is created, you can visit: https://demo3.aifest.org:8889 where you can try out tensorflow.

Wasn’t that easy? Now as a exercise, replace -it in the docker run command by -d. See whether you can get the tensorflow jupyter environment again or not?
You should get the following outputs as in the screenshot below:

Exercise: Create more containers with different ports using the docker run command and see how many get created.
6. Your first Docker Image
We as Data Science folks are picky about what tools we use for our analysis, some like to work with R while others prefer Python. Personally, I’d whine about the above TensorFlow image. I don’t know what’s there in it (unless I look at the source code i.e. the Dockerfile aka recipe). Tensorflow isn’t enough on it’s own, suppose you want to use OpenCV too and maybe scikit-learn & matplotlib.
Let’s see how to create your own custom TensorFlow image!
- First thing you need is to create a
requirements.txtfile. For reference, below is the file that you might want to use: requirements.txt - Our Dockerfile would be comprised of the below components:
- For the base image, we’ll use the official docker image for python i.e. python:3.6.
- Command to update the source repositories (the image uses Debian distribution).\
- Copy the requirements.txt file and pip install the python libraries from the requirements.txt file.
- Command to expose the ports.
- Command to run the
jupyter notebookcommand.
- The final Dockerfile would look as below:
# Base image
FROM python:3.6

# Updating repository sources
RUN apt-get update

# Copying requirements.txt file
COPY requirements.txt requirements.txt

# pip install
RUN pip install --no-cache -r requirements.txt

# Exposing ports
EXPOSE 8888

# Running jupyter notebook
# --NotebookApp.token ='demo' is the password
CMD ["jupyter", "notebook", "--no-browser", "--ip=0.0.0.0", "--allow-root", "--NotebookApp.token='demo'"]- Next step is to build our image, below is the tree structure that can be followed:

- To build the image, run:
docker build -t tensorflow-av .(Note:-tis to tag the image as you wish too. You can version it as well, eg:docker build -t tensorflow-av:v1 . - The logs for all the run is provided here. Once the entire process is completed, the image will be visible in your local docker registry. Run:
docker imagesto check!

- Now that you have created the image, we need to test it. Run the image using the same command you used to run the original tensorflow docker image. Run:
docker run -p 8887:8888 -it tensorflow-av

- Congratulations! You have made your first docker image. To share it, you have two ways in which you could do it:
- Upload the image to Dockerhub. Follow the steps below to do it:
- Login to Dockerhub via terminal:
sudo docker login - Rename the docker file:
sudo docker tag tensorflow-av <dockerhub-id>/tensorflow-av - Push the image to Dockerhub:
sudo docker push <dockerhub-id>/tensorflow-av
- Login to Dockerhub via terminal:
- Export the image to .tar file.
docker save <dockerhub-id>/tensorflow-av > <path>/tensorflow-av.tar
- We can even export the container to a .tar file, along with all the running instances/state and other meta-data.
docker export <container-id> > <path>/tensorflow-av-run1.tar
- Upload the image to Dockerhub. Follow the steps below to do it:
7. Docker Eco-system
Docker provides a good support to build up from a prototype level scale to production levels. Purely from a deployments perspective: docker-machine, docker-compose & docker-swarm are components that help achieve that.

Source: Official Docker Blog
- Want to take your ML API & deploy it to any cloud provider? docker-machine helps you do that.
- Your deployed API is growing in usage, want to scale it up? docker-swarm is there to help you do it without many changes.
- Want to use multiple Docker images in a single application? docker-compose makes it possible for you to do that!
End Notes
Starting off with a new habit is a difficult task. But once the learning curve smoothens out, things start to work out and new ideas open up with the usage. It is the same with Docker, hoping that this primer makes you think about using it in your daily Data Science workflows. Comment down below, how do you plan to use Docker, starting today!
About the Author
 Prathamesh Sarang works as a Data Scientist at Lemoxo Technologies. Data Engineering is his latest love, turned towards the *nix faction recently. Strong advocate of “Markdown for everyone”.